Español abajo
Students will create an elongated painting or drawing of a river and outdoor scenes from their lives that are fond memories or bring them joy. Students will practice making artistic choices relating to orientation of the image, color choices for the background and foreground, learning and using stacked perspective and incorporating narratives into a work of art.
Download Activity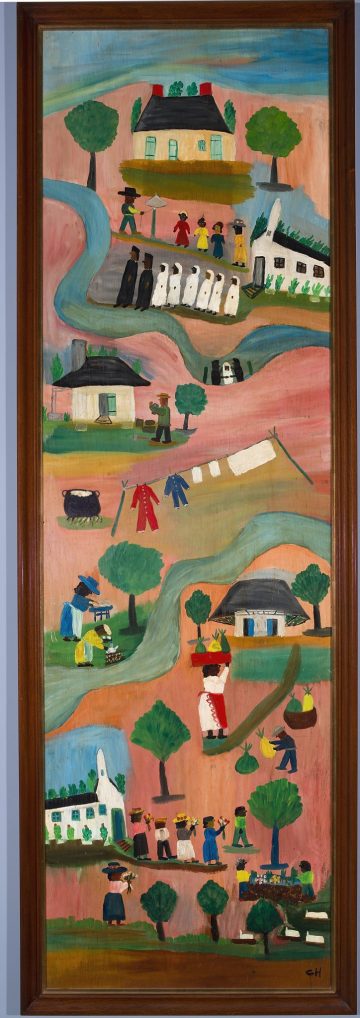
Clementine Hunter, Flowing River, circa 1950, Medium Oil on panel, Gift of Dr. and Mrs. James Michael Fortino, 2008.4
Clementine Hunter was born in 1886 near Natchitoches, Louisiana. She spent the majority of her life working on the Melrose plantation as a farm hand and domestic helper. Hunter had no formal education, she only learned how to read and write in her fifties. Clementine picked up painting in her late forties. Friends of the owners of the plantation came to paint one season and left their supplies for Clementine to experiment with. Clementine was a Self-Taught artist, and the first African American Artist to have a solo exhibition in the New Orleans Museum of Art. Clementine’s artwork depicts stories and scenes from plantation life in the early 20th century.
SUPPLIES
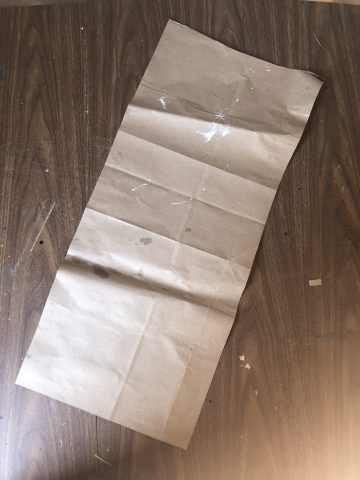
- Large brown paper bag or long thin piece of cardboard or watercolor paper
- Pencil
- Paintbrushes
- Acrylic or tempera paint or markers or colored pencils or water color paint
- Cup for water
- Paper towels
- A covered work surface to paint on
- Palette to mix colors (old Tupperware lid, paper plate, etc.)
PROCESS
-
- Ask students to cut open a brown paper bag and cut out a long strip. If they are using another type of paper, also have them cut a wide thick strip of paper for their art (3/4 of the paper width).
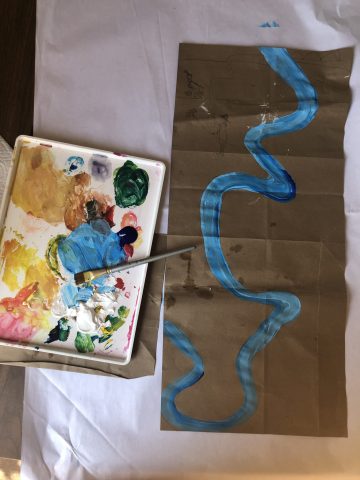
- Turn the paper horizontally (hamburger) and vertically (hotdog). Choose what direction they want to orient their paper.
- Using a pencil draw a river form that crosses from top to bottom and side to side of the paper.
- Ask them to start imagining (but not drawing yet!) 3-4 activities they love or enjoy outside, maybe near their house, a favorite park, etc.
- Make sure they have a protected workspace and apron or old t-shirt ready if they are painting.
- Students begin by drawing a river through and across the entire piece of paper. Encourage them to make one big wavy line that links two or more edges of the paper together. Then trace the line a few inches apart to create the river shape.
- Ask students to set up their palette with the primary colors and white. Next, they will mix colors on their palette to create a blue/s for the river and 2-3 different more neutral colors for the background.
- Instruct students to paint the background and river first. Use big bold strokes and cover the entire surface!
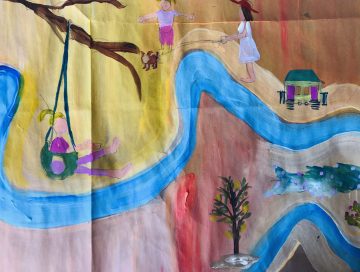
- Once this first layer has dried paint a few different scenes from your childhood that bring you joy, or a few different activities you want to do outside. Don’t worry about details, just use a thinner paintbrush to paint the basic shapes with different colors.
- Ask students to create at least three different scenes scattered throughout your painting. Let it dry. Come back to it in a while and add more and accent what you have with some final details.
- Have students create a title for their piece and sign and date the artwork on the back.
*NOTE:
THIS ENTIRE PROJECT CAN BE DONE WITHOUT PAINT! USE CRAYONS, COLORED PENCILS OR MARKERS AND FOLLOW THE SAME STEPS.
KEY TERMS
Self taught art is created by an artist who has had little to no formal art training.
Stacked perspective is an art making technique used to show distance. Objects placed at the bottom of the canvas are in the foreground and seen as closest to the viewer, while images painted at the top are in the background and are the furthest away.
Primary Colors Red, yellow and blue. From these colors all other colors are made.
Secondary Colors Colors that are created by the mixture of two primary colors i.e. red and yellow make orange, yellow and blue make green, blue and red make violet, etc.
Background The part of the picture plane that seems to be the farthest from the viewer.
Middle ground Area of a two-dimensional work of art between the foreground (closest) and the background (furthest receded).
Foreground Part of a two-dimensional artwork that appears to be nearer to the viewer or “in the front” of the image.
Brushstroke the paint left on a surface by a single application of a brush or palette knife
Tint A slight or pale coloration; a variation of color produced by adding white to it and characterized by a low saturation and high lightness.
Perspective A system for representing three-dimensional objects viewed in spatial recession on a two0dimensional surface.

________________________________________________________________________
ACTIVIDADES ONLINE DEL MUSEO OGDEN PARA EL AULA: RÍO QUE FLUYE | CLEMENTINE HUNTER
Clase de pintura para alumnos de jardín hasta el 6to grado
Los alumnos crearán una pintura o un dibujo alargado de un rio una escena al aire libre de sus vidas, de las cuales tengan lindos recuerdos o que les traigan alegría. Los alumnos practicarán lo que es tomar decisiones artísticas con respecto a la orientación de la imagen, las elecciones de color en el fondo y en el primer plano y aprenderán a utilizar la perspectiva apilada y cómo incorporar narrativas en una obra de arte.
Descargar ActividadClementine Hunter, Flowing River, circa 1950, Medium Oil on panel, Gift of Dr. and Mrs. James Michael Fortino, 2008.4 | Clementine Hunter, Río que fluye, circa 1950, óleo sobre tabla, obsequio del Dr. James Michael Fortino y esposa, 2008.4
Clementine Hunter nació en 1886 cerca de Natchitoches, Louisiana. Pasó la mayor parte de su vida trabajando en la plantación Melrose como trabajadora de campo y empleada doméstica. Hunter no contaba con una educación formal y sólo aprendió a leer y a escribir luego de cumplir cincuenta años. Clementine comenzó a pintar hacia fines de sus cuarenta años. Una temporada, unos amigos de los dueños de la plantación vinieron a pintar y dejaron sus materiales para que Clementine pudiera experimentar con ellos. Clementine fue una artista autodidacta y la primera artista afroamericana en tener una exhibición propia en el Museo de Arte de Nueva Orleans. Las obras de Clementine representan historias y escenas de la vida en la plantación de principios del siglo 20.
MATERIALES
- Una bolsa larga de papel o un pedazo fino de cartón o papel de acuarela
- Lápiz
- Pinceles
- Acrílicos, témpera o acuarelas y/o marcadores y/o lapices de colores
- Una taza para poner agua
- Servilletas de papel
- Una superficie cubierta para pintar sobre ella
- Paleta para mezclar los colores (una tapa de un recipiente plástico viejo, plato de papel, etc)
PROCEDIMIENTO
1. Pídeles a los alumnos que abran una bolsa de papel y corten una tira larga. Si utilizan otro tipo de papel, también pídeles que corten una tira ancha y gruesa de papel para su obra de arte (¾ del grosor del papel):
2. 2. Doblen el papel horizontalmente (como una hamburguesa) y verticalmente (como un hotdog). Elijan en qué dirección quieren orientar el papel.
3. Utilizando un lápiz, dibujen la forma de un río, que cruce de arriba a abajo del papel y que
vaya de lado a lado.
4. Pídeles a los alumnos que comienzan a imaginar (¡pero todavía no a dibujar!) 3 o 4 actividades que amen o disfruten hacer al aire libre, quizás cerca de sus casas, un parque, etc.
5. Asegúrate de que los alumnos cuenten con un espacio de trabajo protegido y con un delantal o una remera vieja si están pintando.
6. Los alumnos comenzarán dibujando un río a través y a lo largo de todo el papel. Aliéntalos a que dibujen una gran línea ondulada que una dos o más esquinas del papel. Luego tracen la línea unos centímetros más lejos para crear la forma de un río.
7. Pídeles a los alumnos que pongan los colores primarios y el color blanco en su paleta. Luego, deberán mezclar los colores en la paleta, para crear un azul para el río y otros 2 o 3 colores neutrales para el fondo.
8. Pídeles que primero pinten el fondo y el río. ¡Den fuertes e intensas pinceladas y cubran
toda la superficie! 9. Luego de que la primera capa se haya secado, pídeles a los alumnos que pinten distintas escenas de su infancia que les traigan alegría, o actividades que deseen realizar al aire libre. No se preocupen por los detalles, sólo utilicen un pincel más fino para pintar las formas básicas con distintos colores.
10. Pídeles a los alumnos que creen al menos 3 escenas diferentes esparcidas a lo largo de la pintura. Dejar secar. Luego de un rato, pídeles a los estudiantes que añadan más figuras u objetos que cuenten acerca de sus experiencias y acentúen lo que ya hicieron para añadir detalles finales.
11. Haz que los alumnos piensen un título para su obra, lo firmen y le pongan la fecha en la parte de atrás.
*NOTA: ESTE PROYECTO PUEDE HACERSE SIN PINTURA! UTILIZAR CRAYONES, LÁPICES DE COLORES O MARCADORES Y SIGUE LOS MISMOS PASOS.
TÉRMINOS IMPORTANTES
Arte autodidacta: creado por un artista que tiene poca o ninguna formación artística.
Perspectiva apilada: es una técnica artìstica utilizada para mostrar distancia. Los objetos ubicados en la parte inferior del lienzo están en el primer plano y se observan más cerca, mientras que las imágenes pintadas en la parte superior están en el fondo y se observan más lejanas.
Colores primarios: Rojo, amarillo y azul. Estos colores son la base de todos los demás.
Colores secundarios: son colores creados por la mezcla de dos colores primarios.
Ejemplo: el rojo y el amarillo hacen el naranja, el amarillo y el azul hacen el verde; el azul y el rojo hacen el violeta, etc.
Fondo: La parte del plano pictórico que se encuentra más lejos del observador.
Plano medio: área de obra de arte bidimensional entre el primer plano (lo más cercano) y el fondo (más alejado).
Primer plano: parte de una obra de arte bidimensional que aparenta estar más cerca del observador o “en frente” de la imagen.
Pincelada: pintura que queda en la superficie, resultado de una única pincelada o aplicación con espátula.
Tinte: una coloración ligera o pálida; una variación de color producida como consecuencia de añadir blanco y que se caracteriza por una baja saturación y una alta luminosidad.
Perspectiva: un sistema para representar objetos tridimensionales vistos en perspectiva espacial en una superficie bidimensional.